Lab 0 - Setting up our workflow
First of all, let me apologize for this being your first lab. Coming from COMP 53 to this (or someone else who hasn't programmed in a while) may be a lot, but the reason for going this route is to start becoming familiar with a workflow that would be closer to what you would do at a job. I'm going to try to do my best here to walk you through the process, and please reach out via Discord!
Step 1 - Let's get Visual Studio Code
For this class, we'll use Visual Studio Code (opens in a new tab). WebStorm may be an alternative that we switch to, but let's start with VSCode as it is a little less resource hungry, and as a text editor it has become very popular very quickly.
Option 1 (Use a package manager)
Here we'll start with a package manager based on your operating system of choice. A package manager is a piece of software that keeps track of what you've installed and allows you to easily install and uninstall entire programs. Many can (when you ask them to) also upgrade to new versions when those become available.
Linux users
You already know what you are doing, once you install VSCode, please go back to troubleshooting your hardware drivers.
Mac users
Use homebrew (opens in a new tab) to install visual studio code via the
Terminal program (opens in a new tab).
Once terminal is open and you've installed homebrew (via another command) you'll then be able to type:
brew install --cask visual-studio-codeAnd then wait while your computer does its magic. Pretty neat right?
Windows Users
Recently, Windows released a package manager called winget that is pretty good.
Most of you should be able to use this right out of the gate.
Open PowerShell (or terminal if you have it instead) and type winget in the command line,
you should see a list of different options listed as well as a version number for winget.
If you do not, you may have to install winget.
You can feel free to let me know if that's the case, but you can also
look here (opens in a new tab) for more directions on installing winget.
Once you have winget, you can type
winget install -e --id Microsoft.VisualStudioCodeIf this is your first time using winget, you may get a message about their user agreement, something like this:

Just type Y once you're ready to accept the agreement, and then go take a break and come back!
Please leave your terminal of choice open (or reopen) as we'll be using it shortly again to install another application.
Option 2 (Only if Option 1 did not work)
Download VS Code (opens in a new tab) and install it. Make sure you pick the correct version for your system. If you are not sure what system you have, it may make more sense to use option 1 with a package manager instead.
Step 2 - Setup a GitHub account
Start by going here
http://education.github.com/pack (opens in a new tab)
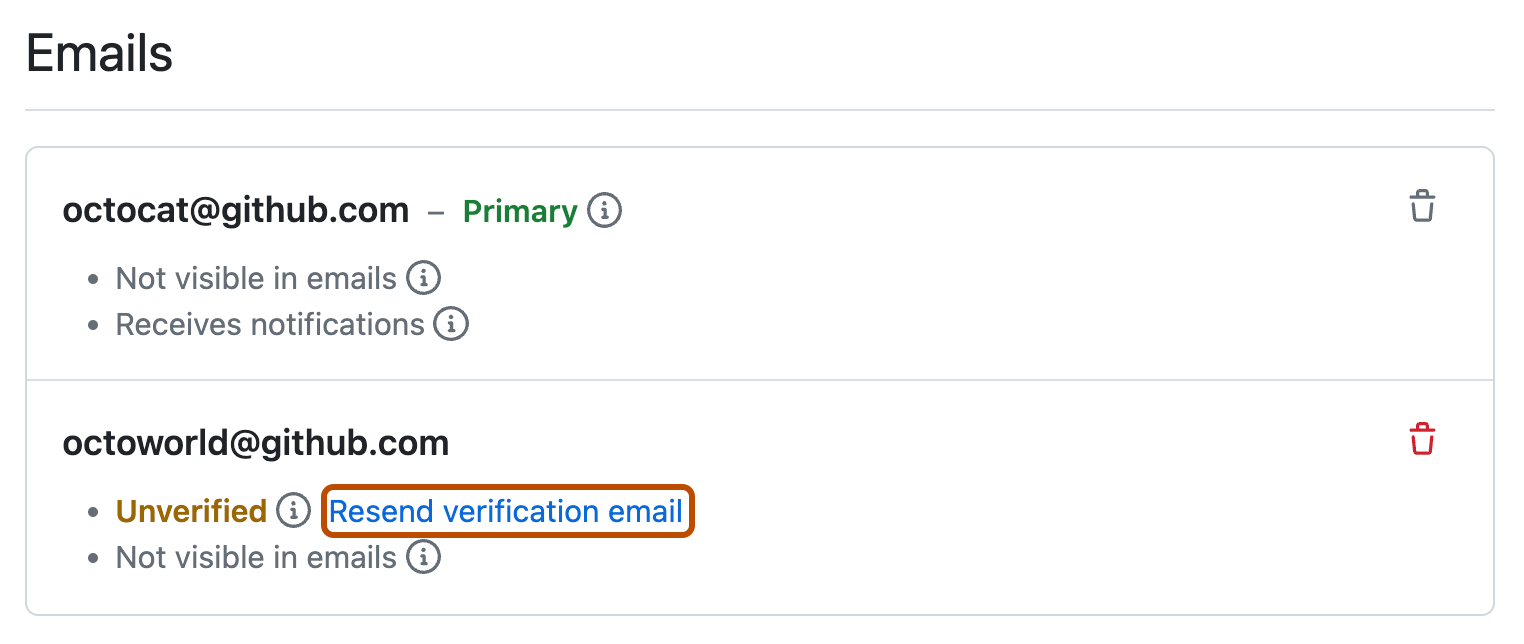
Verify that you have a student GitHub account. Even if you have a GitHub account, you need to make sure that your email address is verified (opens in a new tab)
You can check to see if your email is verified by checking the Emails tab of your account settings in GitHub. If you have a warning icon like this picture, then you’ll want to ask to resend the verification email and verify your email with them.
Step 3 - Make sure git is installed and configured
Some of you may already have git setup. To check, I would type in terminal:
git config --listIf by doing that you get a list of options, two of them being your correct user.name and user.email,
then you are good to go and can move to step 4.
Otherwise, please continue.
Install git
If you saw something like command not found, we'll need to install git, which we'll be using to manage our projects, we'll need to download and install git (opens in a new tab). This can be done via the package manager. Just make sure your terminal program is open and type (or copy)
| Windows | Mac |
|---|---|
winget install -e --id Git.Git | brew install git |
Press enter and wait. It's not too bad. If it complains, you may need administrative privileges, but just let it do its work.
Once it finishes, you may need to restart your terminal, but then we'll get to this
Storing your git credentials
In addition to installing git, we need to make sure that we outline or configure our setup so that git knows who you are. With your terminal open, setup the git user email id and username by typing these commands, making sure to replace the sections with your actual email and username
git config --global user.email [email protected]
git config --global user.name your_GitHub_username
Make sure you press enter after each command. Running
git config --listshould display your username and email (among lots of other options).
Step 4 - Join our GitHub Classroom (opens in a new tab)
Now with a GitHub account, join our classroom by clicking here (opens in a new tab).
Once there, you'll be presented with something like this

Select your email and then click continue, making sure to authorize anything it asks for, and then finally click Accept this assignment. If your email is not there, please contact me.

You will now be a part of the comp127 (opens in a new tab) organization. Once accepted, you'll be greeted with an image like this which will ask you to refresh the page (I would refresh the page after 10-15 seconds).

Once you Refresh, you'll see something like this.

Leave that page open for now. If you want you can click on the URL to visit the GitHub repo, but leave the page open. We'll come back to it later.
Step 5 - Connect VSCode with our GitHub Profile
Once we have created our GitHub repo and account, we are now going to connect our visual studio code with our GitHub account and repo. Open Visual Studio Code.
When you open Visual Studio, there may be a Getting Started or What's New page
that you can feel free to close, since we won't need them for now.
You are going to clone the repository using the buttons in visual studio code,
which you can do either from the files section or the source control section.

Once you follow those steps, your browser of choice will be launched,
where it will ask you to log in to your GitHub account
and to provide authorization to link your GitHub account to VSCode.
Once you go through and click all of the buttons,
you'll finally get to a link where it will want to send you back to VSCode.
In my case, what I did when I saw this window was to click the checkbox to Always Allow
before clicking the Open Visual Studio Code button.

Clicking this will also prompt a question from Visual Studio code as well,
asking if it's ok to open this URL that was sent from the web browser.
In this case, I also checked the box not to ask again and clicked Open.

Unfortunately, once we do that, it may seem like nothing is happening,
or you may see a small notification in your lower left about still trying to complete the process.
Open the notification and click Yes.
At this point should launch one more webpage that says that you are now authenticated
or authorized and that you can close the window and nothing much else on it.

Once you close that webpage, return to VSCode. Now, when you try to clone a repo, you should be able to see the list of options from your GitHub account!
If you are having trouble logging into GitHub via these credentials, please contact me, but you may also need to setup token-based authentication by generating a token to use instead of your password (opens in a new tab)
Step 6 - Cloning the project in VS Code
Once you click on Clone Repository, the application will ask you to choose a repository. You should see the newly created repo up at the top, you'll click on that page. It should look like this:

Once you click there, you will need to specify a location on your local computer
that will receive a copy of the files on GitHub.
Specify whatever directory you think would work for you.
For me in particular, I tend to have a git directory that is at the base level of my home folder (C:/Users/Osvaldo/git/comp127)
Once you select the folder, you'll see a message that it is cloning the repo, and then once done, an option to open the cloned repository. Feel free to click the blue Open button as shown here:

After clicking open, sometimes depending on your settings you may get a scary looking prompt like so, where you need to decide if you trust the files in the folder. I would select that you trust comp127 and even click that checkbox (hey...I'm trustworthy! I swear! I've only been caught lying once! 😉)

Step 7 - Modifying and Syncing changes to GitHub
At that point, you should see in the File Explorer section a list of files along with your project name.
You can click on the Lab 0 folder to see the index.html that you have there.

Once there, you can add the following lines in between the two html tags in your index.html:
<body>
    Hello world!
</body>
Once you place them in there, your file should automatically save (if it doesn't, then please make sure that Auto-Save is turned on, which can be checked from the File menu)
With auto-save turned on, VS Code will let you know that the files differ from what you downloaded,
and will have the m to let you know they've been modified.
We should celebrate and at the same time, keep track of it, by committing the code,
which you can think of as being a special save point where we provide a short reminder of what happened.
Notice that in this case, we were able to add a change that has some meaning..
we were able to add hello, world! to our webpage!
So in the Source Control pane, we provide a message detailing just that, and then we commit the changes, which only stores the changes on your computer.
To sync your changes with GitHub, you click the sync changes button.
🚨🚨🚨 You will be expected to make frequent commits to GitHub. 🚨🚨🚨
Doing frequent commits and providing messages as you go is a little bit cumbersome, but it is part of the software process to make sure that we are providing some sort of documentation as we go through. Because you will be providing these meaningful small commit messages, this will allow you to omit a part of the documentation that you have to provide for your projects and labs on what you have done.

If you'd like the final portion that you would want to do before moving on to the final step is to refresh your GitHub repository on your browser. If you do that, you should see that changes have been recorded.
Step 8 - Setting up Live Server
While the example that I gave you was small, you may want to be able to preview changes to make sure that things were working before you committed. We need to have a way of being able to see how our page would be rendered when we make changes. For this, we'll use a VSCode extension called Live Server (opens in a new tab).
FYI: The actual version compared to the images may be more recent, which is fine.
Go ahead and click on the green install button that is there, and once again,
allow it to Open visual studio code.
(Alternatively, you can use the extensions button
 on the upper left sidebar) and search for
 Live Server.

You'll then click the install button, and once it finishes, you'll get some indication that it has finished.

Notice in the blue status bar there is the text Go Live  .
.
Click on that go live button and you should now see that you get this status message:

As well as a web page that says Hello World!.
This page is being rendered by your computer
(which is why you see the IP address 127.0.0.1 as part of the URL,
along with a particular port which is after the colon.)
Before you move on it makes sense to change your Hello World to include your name instead
and take the screenshot of your local server and vs code side-by-side to upload for your assignment.
You can then change back to World or keep your name for your actual URL.
The way the server works is that it will continue to run until you shut it off,
so for the 1.5 hours of the week that you are not working on COMP 127,
you can stop the web server if you want by clicking here.

Step 9 - Creating a deploy pipeline
So one thing that most businesses look for is to separate working on the code and sharing what you are working on with deploying or sending the changes to a live web server. For us to have a separate place that is "live", we will need to create a separate deploy staging area between uploading changes to a shared repository that everyone can see. To better illustrate this, let me present to you this horribly-made drawing of what we have so far.

In this diagram, the term "You" represents the work that is on your computer in VSCode,
while comp127/git is your lab repo on GitHub that has your handle name.
When you click Sync changes, in VSCode,
that causes your changes to be synced with this repository that is on comp 127.
That repo can be shared across different folks and devices.
Think of a shared repository as something that ends up storing your work, like a google drive,
but with a way of better keeping track of different versions of your code.
What we need then, is a way of uploading that code to an actual server that will serve web pages. Something that is accessible by the rest of the internet, so that other folks can see the actual webpage, rather than just the assortment of files that are in your repo. So what we need to figure out is something like this.

While we could create something that auto-magically will upload our changes from git to the web server (which would be awesome), we run into another small issue. How do we differentiate between sharing code with folks (or even with ourselves as we are working on it versus having something that we want to deploy to the outside world?)
 We can't just have an automatic link between the GitHub server and the web server,
since we may want to share something on the GitHub server with our team members
but do not want to share it with the world just yet.
we'll need to have a separate deploy step that involves us deploying the code to the web.
While there are many ways of having this be separated,
we are going to follow a workflow that fits with our permissions and circumstances.
We can't just have an automatic link between the GitHub server and the web server,
since we may want to share something on the GitHub server with our team members
but do not want to share it with the world just yet.
we'll need to have a separate deploy step that involves us deploying the code to the web.
While there are many ways of having this be separated,
we are going to follow a workflow that fits with our permissions and circumstances.
What we are going to do is to have a fork of our repo (that we will place into our personal account) that we will connect to a web server. That way, we can still share code and have a "one-click" way of deploying our code to the web. So what our final diagram will look like is something like this.

So that is what we are going to set up next.
Step 10 - Setting up the fork of our project
Here we are going to go to GitHub to set up a fork. Remember that the fork's job is merely to interact with the web server. We will never actually try to commit code directly to this fork, but rather set it up so that when this fork syncs with the main repo in 127 the web server will be updated magically. If you followed the directions from the beginning you should have this done completely. Your VS Code is already set up to interact with the comp 127 repo that you have.
To set up a fork, merely go to the comp127 webpage from your repo.
This can be accessed if you go to http://github.com/comp127/labs-127-yourusername
Once there, you will see a fork button at the upper right, like this.

Once you click Fork, you'll be presented with another intermediate page. I would leave all of this the same (just confirm this is in your repo) and just click the Create fork button at the bottom.

You now have a fork that you should not ever contribute to. This will merely serve as a way to get our changes (when we are ready, synced via a button on that personal repo page.)
Let's move to the next step.
Step 11 - Setting up CloudFlare
While we have the changes in our GitHub repo and we have both our development repo and staging repo ready, we are going to do a couple more things to get this so that when we push code, we can get it to deploy to the internet. Let's set up a hosting provider/service.
For this semester, you'll get exposure to using two different providers, CloudFlare and Heroku. We'll start with CloudFlare, so go ahead and head over there and create a new account (opens in a new tab).
You'll need to verify your email. Once you do, you'll follow the steps they outline here (opens in a new tab)
1. Login to Cloudflare (opens in a new tab)
2. From the dashboard home, click Workers & Pages on the left
3. Click the Create button in the upper right, click the Pages tab, then the Connect to Git button

Or if you don't see that you'll see a blank page with the same option to Connect to Git.

4. You'll need to signup or connect your GitHub account to your Cloudflare account
So click that option:

You'll need to click on your username to install Cloudflare pages and provide authorization. You will still see comp127, but you will not be able to add that to the repo.
5. Once connected you should be able to see something like this

6. Click Begin Setup to get started
You'll then be moved to another page to set up the build. Because we will be starting with basic web development, we'll leave all the options as default.
7. Click Save and Deploy at the bottom
You'll now be presented with one more screen,
where you'll notice that Cloudflare is using some of its CPU cycles to deploy the page to the internet.
After a few seconds, you should see some type of success message, like this:

8. Visit your new webpage and continue reading
You then might shed a smile 😊 (or a sigh of relief! 😅), if you click on the page though,
that sense of joy will quickly disappear 😵😡, as we get something like this:

9. Fix the URL
Have no fear though, the reason for this
is that the web server is looking for an index.html at the root of our repository,
and since there is no index.html at the base (it's in fact in lab0), the server is reporting that it's not found.
To fix this, we merely need to add /lab0 to your URL.
Once you do that, then voila!
You should get a greeting.

SOS: Still not getting a greeting? This is sometimes due to how Chrome caches webpages, so you can either:
- go get a beverage and then come back to it and click again
- try holding down shift and then clicking reload
- try editing the URL to go somewhere else and then re-edit it back to the correct spot
10. Want to make changes?
Here's the workflow
So now if you want to make changes, what you'll do is this set of steps.
- Make changes in your VSCode
- Test them via your live server (in VSCode)
- Commit your changes
- When ready to upload changes to share with other devs (or to the teaching staff), push those changes to the 127 server via the sync changes option in VS Code
- When ready to deploy your changes to the web server, open up your personal GitHub repo for labs127
and click sync the fork to sync those changes.

- Syncing your personal fork will then automatically cause the Cloudflare web server to deploy the new version of your code, which you'll be able to hit refresh on your browser after a minute or two.
FYI: While there are other ways of deploying websites these days, (like directly through github) We will use this format for this course to get you exposure to a different way of doing things.
11. Celebrate 🎉🎊🥳
Your page is now visible to all of the internets. Now go take a leisurely walk outside. You did well here. You will be submitting a screenshot of your vscode project (with html code visible) side-by-side with the localhost running on your machine, but with the picture, please use your name instead of world for the greeting, so that we know that it does in fact change.
Once submitted, you will also make a submission comment that contains your cloudflare url.
I know this was a lot, but congrats! Getting this up and running is a very tough and underestimated step, so congrats again!